DIY Floating Shelves: How to Build and Customize Your Own Wall Storage

DIY Floating Shelves: How to Build and Customize Your Own Wall Storage
Tired of bulky bookshelves taking up precious floor space? Ready to elevate your home decor with a modern, minimalist touch? Then it's time to embark on a DIY adventure and build your own floating shelves! These stylish and functional storage solutions are easier to create than you might think, offering a fantastic way to personalize your space and showcase your favorite belongings.
This guide will walk you through the entire process, from choosing materials and planning your design to installing your masterpiece. Get ready to unleash your inner builder and transform your walls into stunning storage havens.
Planning Your Floating Shelf Project
Before you grab your tools and get sawing, it's crucial to plan your floating shelves. Consider these factors:
1. Determine Shelf Size and Number
Measure the space you want to fill and decide on the dimensions of your shelves. For smaller items like plants and photo frames, a 12-inch depth might suffice. For larger items like books or decorative pieces, you'll need a deeper shelf (18-24 inches). Consider the number of shelves you want and their placement to create a balanced and visually appealing design.
2. Choose Your Materials
The material you choose for your shelves will determine their style and weight capacity. Popular options include:
- Wood: Durable, versatile, and available in various finishes. Pine and plywood are budget-friendly choices, while hardwoods like maple and oak offer greater strength and elegance.
- Metal: Sleek and modern, offering a clean industrial aesthetic. Steel, iron, and aluminum are popular choices.
- Glass: Adds a touch of sophistication and makes objects appear to float. Ensure you choose tempered glass for safety and strength.
3. Decide on Shelf Brackets
The brackets will hold the weight of your shelves and determine their overall appearance. Consider options like:
- Metal L-brackets: Simple, affordable, and offer strong support.
- Decorative Brackets: Add a touch of flair with ornate or industrial-style brackets.
- Hidden Brackets: Create a clean, seamless look by concealing the brackets behind the shelves.
Gathering Your Tools and Materials
Once your plan is in place, gather your tools and materials. You'll need:
- Saw: A circular saw or table saw for cutting the wood. A jigsaw can be used for intricate cuts.
- Drill: With various drill bits, including countersinking bits for screws.
- Screwdriver: For attaching brackets and securing the shelves.
- Tape Measure: For precise measurements.
- Level: To ensure your shelves are perfectly straight.
- Pencil: For marking your cuts and placement.
- Sandpaper: For smoothing out any rough edges.
- Wood Glue: For extra support and stability (optional).
- Wood Stain or Paint: To enhance the appearance and protect the wood.
- Protective Gloves and Eyeglasses: For safety.
Building the Shelves
With your tools and materials ready, let's get building!
1. Cut the Wood
Using your tape measure, mark the desired length and width of your shelves on the wood. Make precise cuts with your chosen saw. Ensure the cuts are straight and clean.
2. Sand the Edges
Smooth out any rough edges or imperfections on the shelf surfaces and edges using sandpaper. Sand in the direction of the wood grain for the best results.
3. Stain or Paint (Optional)
If you want to enhance the appearance or protect the wood, apply a stain or paint. Choose a color that complements your decor. Let the finish dry completely before moving on.
Installing the Shelves
Now comes the fun part â€" installing your floating shelves!
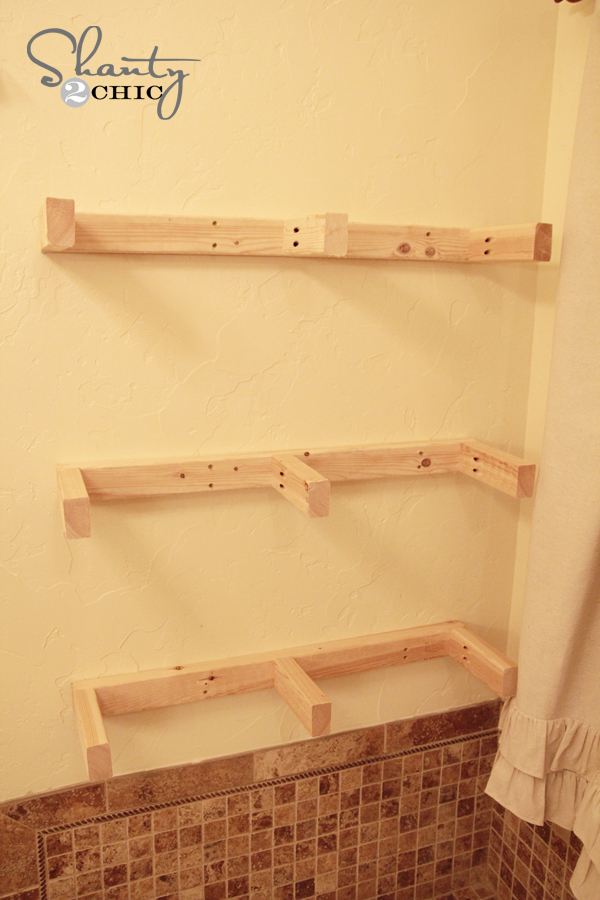
1. Mark the Bracket Placement
Hold the brackets against the wall where you want to place the shelves. Use a pencil to mark the locations for the screws. Remember to consider the thickness of the shelf when marking the placement.
2. Drill Pilot Holes
Drill pilot holes at the marked locations for the screws. This will prevent the wood from splitting when you screw in the brackets.
3. Install the Brackets
Secure the brackets to the wall using screws. Use a level to ensure the brackets are straight and even. Drive the screws in firmly, but avoid overtightening.
4. Attach the Shelves
Carefully place the shelves on top of the installed brackets. Ensure they are level and properly aligned.
5. Secure the Shelves (Optional)
For added stability, you can optionally secure the shelves to the brackets using screws. This is especially recommended for heavier shelves.
Adding Finishing Touches
Your floating shelves are now ready to adorn your walls! Here are some final tips:
- Arrange your belongings artfully. Consider the height and weight distribution of your items.
- Use decorative boxes or baskets to conceal clutter.
- Add lighting to highlight your shelves and create a dramatic effect.
Congratulations! You've now mastered the art of building and customizing your own floating shelves. Enjoy the satisfaction of transforming your space into a stylish and functional haven. With your newfound DIY skills, the possibilities are endless!
0 comments:
Post a Comment
Note: Only a member of this blog may post a comment.