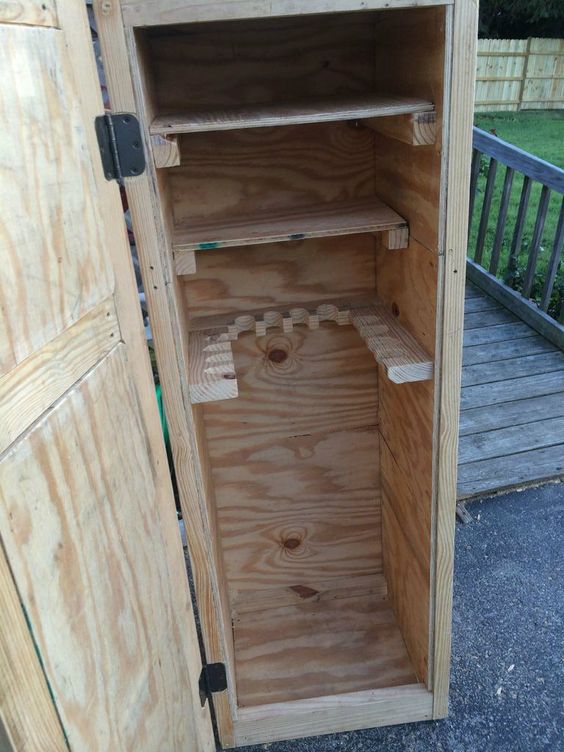
DIY Guide: Building a Wooden Gun Cabinet for Maximum Storage
Hey there, gun enthusiasts! Tired of your firearms cluttering up your space? Want a safe, secure, and stylish way to store your collection? Well, you're in the right place! This DIY guide will walk you through building a wooden gun cabinet that maximizes storage and adds a touch of class to your home.
Getting Started: What You'll Need
First things first, let's gather our materials. You'll need the following:
- Lumber: Choose a sturdy hardwood like oak, maple, or cherry for durability and a nice finish. You'll need 1x4s, 1x6s, and 1x8s for the frame, shelves, and doors.
- Plywood: ½ inch thick plywood for the back panel and shelves.
- Hardware: Hinges, door handles, shelf supports, a lock, and screws.
- Wood glue: For strong, lasting joints.
- Wood filler: For patching any minor imperfections.
- Sandpaper: A variety of grits for smoothing the wood before finishing.
- Finish: Stain, paint, or oil based sealant for a beautiful and protective coating.
- Safety gear: Safety glasses, gloves, and dust mask.
- Power tools: Table saw, miter saw, drill, and sander.
- Hand tools: Hammer, screwdriver, measuring tape, level, pencil, and a chisel (optional).
Designing Your Dream Cabinet
Before we get into the construction, let's plan out the layout. Consider the following:
- Size: Measure the space where you want the cabinet. How many guns do you need to store? What other items will you put in it?
- Style: Do you want a traditional, modern, or rustic look?
- Features: Do you want adjustable shelves? A built-in drawer? A magazine rack?
- Security: How strong of a lock do you need? Will you add additional security features like an alarm?
Sketching it Out
Once you have a general idea, draw a simple sketch of your cabinet. This will help you visualize the layout and figure out the dimensions of the various parts. Don't worry if you're not an artist, just a rough drawing will do!
Building the Cabinet: Step by Step
Okay, now let's get our hands dirty and build that cabinet! Here's a breakdown of the process:
Building the Frame
- Cut the pieces for the frame using your table saw or miter saw. Make sure your cuts are precise and at 90-degree angles.
- Assemble the frame using wood glue and screws. Use a level to make sure the frame is square and plumb.
- Once the glue is dry, reinforce the frame with additional screws or even by adding corner braces for added strength.
Installing the Back Panel and Shelves
- Measure and cut the back panel from plywood. Attach it to the frame using wood glue and brads.
- Measure and cut the shelves to fit the cabinet. Make sure they are level and secure.
- For adjustable shelves, consider using shelf supports and metal pins. These allow you to easily change the shelf height.
Making the Doors
- Measure and cut the door panels from plywood. You can use multiple panels for larger doors.
- Create a rabbet on the edges of the door panels using a table saw or router. This creates a groove that will hold the door stiles and rails.
- Cut the stiles and rails to size and fit them into the rabbet. Make sure they are flush with the door panel.
- Glue and screw the stiles and rails to the panel.
Finishing Touches
- Sand the entire cabinet using sandpaper of progressively finer grits to smooth out any rough surfaces.
- Fill any holes or imperfections with wood filler.
- Sand the filler smooth after it dries.
- Apply a stain, paint, or sealant to the cabinet. Make sure to follow the manufacturer's instructions for application and drying times.
- Install the hinges, door handles, and lock on the doors.
- Add any decorative features like moldings or trim.
- Let everything dry thoroughly before loading your firearms into the cabinet.
Safety First: Security and Locking Mechanisms
Now, let's talk about safety! A gun cabinet is meant to keep your weapons secure, so make sure you choose a reliable lock. Here are some things to consider:
- Lock Type: Key lock, combination lock, or electronic lock? Each has its own pros and cons.
- Lock Strength: A sturdy lock is crucial! Choose a lock that's hard to pick or break.
- Additional Security: You can add extra security features like a locking hasp, a bolt-down system, or even an alarm system.
Tips for Success
Here are a few extra tips to make your DIY gun cabinet project even more successful:
- Plan Ahead: Carefully measure and plan out your design before you start cutting wood.
- Use Quality Lumber: Invest in good quality hardwood for a durable and beautiful cabinet.
- Be Patient: Building a cabinet takes time. Don't rush the process or try to cut corners.
- Don't be Afraid to Ask for Help: If you're not comfortable with any step of the process, ask a friend or family member who has experience with woodworking.
- Have Fun!: This is a great project to showcase your skills and create something you can be proud of.
Conclusion
There you have it, a step-by-step guide to building your own wooden gun cabinet! With a little time, effort, and a passion for woodworking, you can create a safe, secure, and stylish storage solution for your firearms. Remember to always prioritize safety and choose high-quality materials and hardware. Happy building!

0 comments:
Post a Comment
Note: Only a member of this blog may post a comment.